Automation Data Type and usage in Dynamics NAV
Hello guys, nowadays we have so many integration with other third party applications. Sometimes you might use your own classes to get some work done. Here are some important article regarding Automation Data type and its usage in Dynamics NAV.
Let’e begin with basics, What is Automation data type ? Of course, it is complex data type in dynamics NAV, Also it uses the Automation data type to reference an automation server. In order to use an automation server in C/SIDE. This kind of things falls under COM technologies. C/SIDE supports COM and it has two ways: using custom controls (OCXs) and as an automation controller.
Please note that we have some limitation when we use COM.
- Only non-visual controls are supported.A control cannot be used to add graphical elements to a C/SIDE object. For example, you cannot add a third-party control to a form. The control can, however, display information and interact with the user in a window of its own.
Let’s go bit deeper now. Let me create simple C# class to demonstrate how to create automation type object and register it and call inside Dynamics NAV.
I am assuming you are good at C# Programming.
- Create New Class Library Project (File -> New ->Project->Class Library)
- Name it as AutomationObj
- First of all we need to setup some properties
- Select Project->AutomationObj Properties
- Application Tab you will find Assemble Information option. Click on it.
- You will get new window at the bottom there is check box, Make assembly COM- Visible. Tick that
- Select Build tab , at the bottom you will see check box called Register for COM interop. Tick that
- Select Signing Tab, there is a check box called, Sign the assemble. Tick that
- Also chose strong name key file by giving <New>
- All are done and you may close the setup window by saving all.
- You may need to add the namespace for InteropServices. You can do it using System.Runtime.InteropServices;
- Now its time to declare the interfaces
- You need to declare [ComVisible(true)] , [Guid(“41E646B3-F65C-4d8e-8539-499FA56C7076″)] , [ProgId(“AutomationObj”)] ,[ClassInterface(ClassInterfaceType.AutoDual)]
- So now your code similar to following,
using System;
using System.Collections.Generic;
using System.Linq;
using System.Text;
using System.Threading.Tasks;
using System.Runtime.InteropServices;
namespace AutomationObj
{
[ComVisible(true)]
[Guid(“41E646B3-F65C-4d8e-8539-499FA56C7076”)]
[ClassInterface(ClassInterfaceType.AutoDual)]
[ProgId(“AutomationObj”)]
public class AutomationObj
{
}
}
- Now I will add simple function and with return type, Here how it looks like,
using System;
using System.Collections.Generic;
using System.Linq;
using System.Text;
using System.Threading.Tasks;
using System.Runtime.InteropServices;
namespace AutomationObj
{
[ComVisible(true)]
[Guid(“41E646B3-F65C-4d8e-8539-499FA56C7076”)]
[ClassInterface(ClassInterfaceType.AutoDual)]
[ProgId(“AutomationObj”)]
public class AutomationObj
{
//New function this will return String and use inside Dynamics NAV
public String MyFunc(){
return “This is Return”;
}
}
}
We almost finish the C# program. Now we need to build the code, you can select Build then Build Solution.
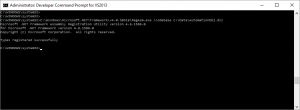
Now we need to register AutomationObj.dll to use inside Dynamics NAV. You can use Developer Command Prompt to register .dll, Run the program as administrator and type the command as follows,
C:\Windows\Microsoft.NET\Framework\v4.0.30319\RegAsm.exe /codebase C:\Data\AutomationObj.dll
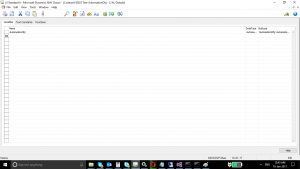
Let’s move to Dynamics NAV, Create new Codeunit and name it as Test-AutomationObj
Add new global variable named AutomationObj and Data Type is Automation, drill down and chose AutomationObj as Sub Type.
Inside On Run trigger you can write code as follows,
CREATE(AutomationObj);
MESSAGE(AutomationObj.MyFunc); // Call the function which we created
I would hope you have learned some new thing here, Please post your queries and suggestions.